When posting about the great
Valentine's shirts I made for the boys, I tried to find a link to the tutorial that inspired my short-sleeve-to-long-sleeve conversion. I searched and searched, but google completely failed me! So I figured I'd make my own tutorial.
The layered tee is a pretty popular look for kids these days, and it is actually a pretty simple conversion.
To start, grab an old t-shirt and a long sleeve shirt that fits your kid.
Lay the long sleeve shirt on top of the old tee, with the sleeve hem even with the bottom hem of the shirt. Trace the sleeve onto the tee, adding 1/2" for a seam allowance. I learned the hard way to also measure the width of of the short sleeve you will be sewing the long sleeve into. You want to make sure the long sleeve is not too narrow or too wide, or it will make it much more difficult to sew in. (I trace all the way up to the shoulder. You don't actually need it that long, but I found it helps line the sleeve up correctly. You can cut off the extra material later).
Cut the sleeves from the shirt. If you fold the shirt in half, you can cut both sleeves with one cut.
Pin sleeve with right sides facing, and stitch up side. Knits can be kind of finicky to sew. I've had success stitching with a strait stitch on the seam allowance, the using a zigzag stitch just inside the seam allowance. Then trim the excess fabric to the seam isn't too bulky.
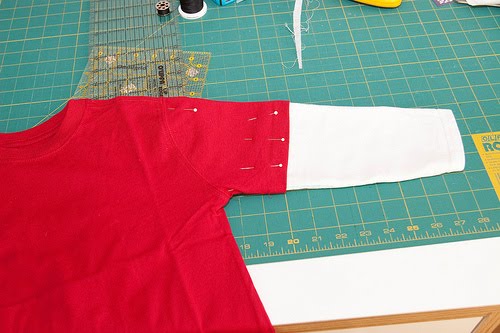
Turn the sleeve right-side-out and pin inside the short sleeve of the shirt. Make sure to line up the seams of the two sleeves, and center the shoulder of the long sleeve on the shoulder of the short sleeve.
Next, stitch the long sleeve into the short sleeve shirt, stitching along the serged seams of the sleeve. This just allows you to hide the stitching better.
Again, I used a straight stitch, then used a zigzag stitch just outside the stitching. After zigzaggint, trim the extra material just outside the zigzag stitching.
Turn the shirt right-side-out and you have a great looking layered t-shirt!

It's not only a fun look, it's also a great way to extend the life of some of your kids short-sleeve shirts. They can wear them for another season before growing out of them!


