Friday, February 17, 2012

Tutorial: Adding Long Sleeves to a Short Sleeve Shirt


When posting about the great Valentine's shirts I made for the boys, I tried to find a link to the tutorial that inspired my short-sleeve-to-long-sleeve conversion. I searched and searched, but google completely failed me! So I figured I'd make my own tutorial.


The layered tee is a pretty popular look for kids these days, and it is actually a pretty simple conversion.

To start, grab an old t-shirt and a long sleeve shirt that fits your kid.


Lay the long sleeve shirt on top of the old tee, with the sleeve hem even with the bottom hem of the shirt. Trace the sleeve onto the tee, adding 1/2" for a seam allowance. I learned the hard way to also measure the width of of the short sleeve you will be sewing the long sleeve into. You want to make sure the long sleeve is not too narrow or too wide, or it will make it much more difficult to sew in. (I trace all the way up to the shoulder. You don't actually need it that long, but I found it helps line the sleeve up correctly. You can cut off the extra material later).


Cut the sleeves from the shirt. If you fold the shirt in half, you can cut both sleeves with one cut.


Pin sleeve with right sides facing, and stitch up side. Knits can be kind of finicky to sew. I've had success stitching with a strait stitch on the seam allowance, the using a zigzag stitch just inside the seam allowance. Then trim the excess fabric to the seam isn't too bulky.


Turn the sleeve right-side-out and pin inside the short sleeve of the shirt. Make sure to line up the seams of the two sleeves, and center the shoulder of the long sleeve on the shoulder of the short sleeve.
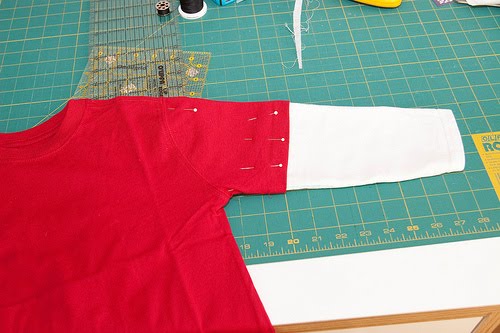

Next, stitch the long sleeve into the short sleeve shirt, stitching along the serged seams of the sleeve. This just allows you to hide the stitching better.


Again, I used a straight stitch, then used a zigzag stitch just outside the stitching. After zigzaggint, trim the extra material just outside the zigzag stitching.


Turn the shirt right-side-out and you have a great looking layered t-shirt!


It's not only a fun look, it's also a great way to extend the life of some of your kids short-sleeve shirts. They can wear them for another season before growing out of them!


Pin It

Saturday, January 28, 2012

Valentine's Tie Shirts

Valentine's Day is around the corner, and I wanted some cute shirts for the boys. I love little boys shirts with ties on them, and thought a tie shirt with a little heart cut out of it would make for a cute Valentine's shirt.


I looked all over for a plain red long-sleeve shirt for this project and couldn't find one. I was about to give up when I remembered reading a blog post (which I didn't bookmark and can't find now) with a tutorial for turning a short-sleeve shirt into a layered-look long sleeve tee. So, I grabbed one of my old t-shirts and cut some sleeves out of them to sew into the short sleeves.


I used my Silhouette Cameo to design and cut the ties, and ironed them onto the shirts with fusible interfacing. Then zigzag stitched around them. Quick fun project, and the boys look cute in their new shirts.

Of course, just 'cause you dress them up, it doesn't mean they'll behave! Boys will be boys!

Pin It

Wednesday, January 25, 2012

Fabric Box Dresser Organization.

For the sake of my craft space (and my budget), I won't buy fabric unless I have a project in mind for it. If I find a fabric I like, I will do whatever I can to think up a project to justify the purchase. That's how The Monkey ended up with these cute boxes to help organize his dresser.


I fell in love with these fabrics the first time I saw them at Hipstitch. I made several trips to the store before I finally bit the bullet and bought them. I turned them into little boxes to put in his dresser so his socks and underwear don't get lost among all his pajamas. Yeah, I know, quite a stretch to justify the purchase of these fabrics.

I roughly followed my own fabric box tutorial, with a few modifications. I didn't need quite as much structure in these boxes, so I used fusible fleece instead of a heavy-weight interfacing. And rather than sewing the lining in inside out and turning the boxes, I placed the lining in the box, wrong sides together. Then bound the boxes with some red grosgrain ribbon I had in my stash.

I love the way they came out. And now there are no more complaints from The Monkey that he can't find his socks when he gets dressed in the morning!


Friday, January 6, 2012

Christmas Round Up: iFlirt

Baby Brother is quite the flirt. He loves to smile and babble at people, then coyly turn and bury his head in my shoulder, only to look up and grin again. It charms everyone he meets.


After watching him flirt with all the other passengers and flight attendants on a trans-Atlantic flight, I joked that I needed to find him a shirt that says "I flirt." And as soon as I said it out loud, I knew exactly what I needed to do.


We're big Mac fans around here, and I thought iFlirt, a play on the i-everything from Apple would be really cute. I wanted white letters on a black shirt. When I went looking for a shirt to use, I found this black turtleneck a la Steve Jobs, and it was perfect.


I found a font that is very close to the font Apple uses for iPods, iPhones, iPads etc. and traced the letters onto fusible interfacing. I cut them out of the fabric/interfacing and ironed them on to the front of the shirt. It was a quick, simple project, and I love the end result.


Saturday, December 31, 2011

Christmas Round Up: Cat in the Hat Pajamas

The Monkey loves anything Dr. Seuss. Especially the Cat in the Hat. I found some great Cat in the Hat flannel when I visited one of my favorite Atlanta-based fabric shops last fall. I knew right away I had to get some to make pajamas for The Monkey.


I decided to keep it simple and just make PJ pants, and get a simple white tee-shirt for the top. After buying the tee-shirt, I had a brilliant idea: jazz it up with the Cat in the Hat's signature bow tie (or Tie Bow as The Monkey calls it).


I printed out a picture of the bow tie, scaled to the size I wanted it, then played around with the shape a bit to allow for the pleats. I wrapped the center piece around it to appear as if it were "tied." I used fusible interfacing to tack it to the shirt, then stitched it on to secure it better.

He LOVED his new pajamas. He put them on right away, and wears them several nights a week. And it warmed my heart when he gave me a hug and said "Thank you for my Cat in the Hat jammies! I love them!"

Christmas Round Up: Super Hero Cape and Mask


As soon as I came across this blog post, I knew I had to make a Super Hero cape for the Monkey.


I have a stack of old t-shirts in my craft room that have been waiting to be turned into projects. I also have lots of felt sitting around in my fabric stash. So I had plenty to pull from to make this cape.


After cutting out the cape pieces, I found a Superman logo online, and used it as a template to make the "S" for the cape (since the Monkey's name begins with an S). I decided to go with blue and yellow because I didn't want it to be an exact replica of Superman's. The tee-shirt I used to make the cape was an old college shirt that had the name of the school up at the top. So I covered it with the blue and yellow stars around the collar.


He had a Super Hero cape that one of the church nursery volunteers made for him, but he always needed our help to tie it on. Since this one attaches with velcro he can put it on himself!

After making the cape, I came across this post, and realized every Super Hero needs a mask! So I quickly threw together a mask to match his cape.


After opening presents Christmas morning, we took a walk to the park to run off some energy. The Monkey insisted on wearing his new super hero outfit.

Blast off!

Thursday, December 22, 2011

Christmas Sewing for Monkeys

I've been working on Christmas gifts for The Monkey and Baby Brother.


The Monkey will be getting the Cat in the Hat Quilt, Cat in the Hat Pajamas, and super hero cape and mask. The fabric taggy Grinch book and the iFlirt shirt are for Baby Brother. More on these projects after Christmas when I can get some better pictures of them. Til then, Merry Christmas! (Or Happy Hannukah! Or Happy Solstice! Or Happy December!)